Special thanks to Jeff Hollen for photographing his build for use on the site.
Preparation
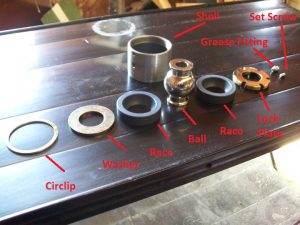
Unpack your purchase and make sure it is all there. For each set you should have two shells, two nickel plated balls, four plastic races, two circlips, two thick washers, two threaded plates, two set screws, and two Zerk fittings.

Parts for one UCAB laid out- 1 order will contain enough to build one pair of UCABs.
Basically, the bushing is made up of the shell, the ball, the races, and the retaining parts. The circlip and the washer retain one end, one race is pressed in, the ball is inserted then the other race is pressed in.
You should use a high quality bearing grease to lube these bushings. High temperature grease is best since the passenger side joint is exposed to exhaust heat.
Building the joint
Note: You can either press the bare shell into the arm and build the joint in the arm or build the joint and press it into the arm afterwards. You may find it easier to work with just the joint and press it into the arm at the end, or you may prefer to have the arm clamped in a vise while you put things together. I have done it both ways, so it is up to you. You cannot use the zerk fitting to grease the bushing if you press the shell in first. If you plan to press the shell in first, check the installation section before you press the shell in.
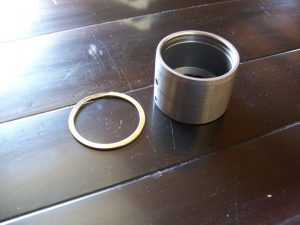
So, begin by installing the circlip. No tools are needed here, just get the circlip split and started in the groove. Once you do that you can work it into the groove bit by bit.
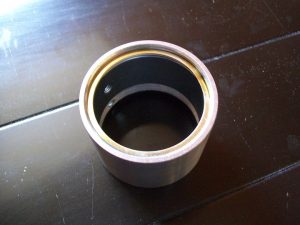
Now place the large washer inside the shell. Do not forget this step or you’ll get to the end and facepalm (don’t ask me w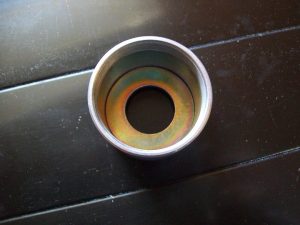 hy I mentioned this.)
Now the hard part. You must press the first race in. You can do this with a hydraulic press, a large vise, a large C clamp, or a large bolt along with some washers and/or large sockets. The flat side of the race faces the washer you just installed. The race is meant to be a tight press fit. You cannot press it in by hand and you cannot tap it in with a hammer. Trust me. Press it in tight against the washer, but make sure that you don’t go so far that you force the snap ring out, just snug against the washer. If you have done it right, the washer will not move by hand and the snap ring won’t look like it is ready to explode.
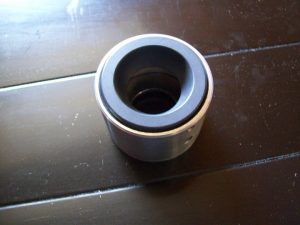
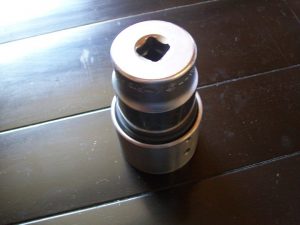

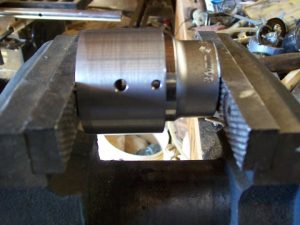
Now install the ball. If you have not got a grease gun, now is the time to apply some grease to the joint. You should get some on the cupped portion of the race where the ball will sit as well. The gap left between the races once they are pressed in is about 1/8 of an inch, so you don’t need tons of grease. Jeff used some snotty green Mercedes grease. I use a high temp marine grease that resists washout and poundout. I have not had any issues yet. Just make sure you get quality grease. Because I use a grease gun, I put them together with no grease at all at first. It makes less mess in my living room where I assemble these.

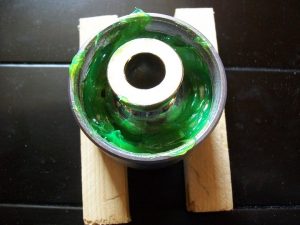
Install the second race. The cupped side obviously goes toward the ball. I know you know that, but some people need constant supervision, so I figured I’d mention it. You will need to press this race in as well. Here is where it is handy to have a large socket. You have to support the shell while you press the race in and you need to clear the neck of the ball. You want to press the race in so that when you are finished, there should be a little bit of play, so the ball can not only pivot, but it can move side to side. If you go too far and the ball is too tight, don’t worry, we’ll cover adjusting the end play later.
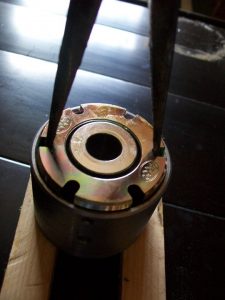
Screw in the lock plate with the stamped logo facing outward, but don’t worry about tightening it yet. The lock plate screws in and retains the race you just pressed in. The set screw keeps the lock plate from turning on its own. Here you can see that Jeff is using a large pair of needle nose pliers. You can also screw the lock ring in by hand or with the special tool. Right now, it is not tightened all the way.
Greasing the joint
While the joint is out, you can use a grease gun to grease the joint. Simply screw in the Zerk fitting and add grease until it won’t take any more or until it starts to squeeze past the races. Now remove the fitting and place it in a drawer somewhere and forget about it. You won’t need it again for a long time. I have been asked if it is possible to drill the arm to allow the joint to be greased without removal. While this is technically possible, I do not recommend it. If you do so, you do it at your own risk.
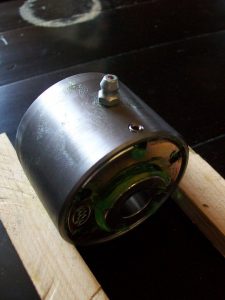
Zerk fitting installed. Remember to remove it before pressing the joint into the arm. If you buy a preassembled kit, the zerk fitting will be in place to contain the grease, but it must be removed before the joints are pressed into the control arms.
Installing the joint into the arm
This requires a hydraulic press or a really good threaded rod type press to execute but it is simple. Press the old bushing out, press the new one in. I like to press the joint in so that the lock plate faces the center of the car, but it is not necessary to do it this way. What is necessary is that you press the joint in so that it is centered and that you leave enough room to remove the set screw. If you have not left enough room, the housing is not centered in the arm. I also like to leave the set screw with the hole pointing down. Again, not strictly necessary.
Important note: If the housing presses into the arm too easily, like there is too much clearance, stop and contact me. If this happens, please measure the housing to make sure it is the correct diameter. I have had one single arm that had a hole that was too big. I used a couple of drops of bearing retainer Lok-tite to secure it and the problem was solved.
Setting the end play in the bearing
You cannot pre-set the correct amount of play in the joint while the joint is out of the arm. This is because once it is pressed into the arm the clearances change. You need to adjust it after the joint is pressed into the arm but before you install the arm on the car. If you have purchased a pre-assembled set you need to set the end play before installing the arm in the car. Ideally you want to be able to pivot the ball by hand without any tools, but you don’t want it to rattle around.
Now, you If you pressed the second race in too tightly or screw the lock plate down too tightly, the ball won’t be free to pivot and will bind. To free up that other race a little, you need to unscrew the lock plate a couple of notches and hit the ball on the opposite side to drive that race apart a little. Use a soft faced or brass mallet, a block of wood and a hammer, or slam the flange of the ball down on a piece of wood while holding the housing, whatever works for you so long as you don’t damage the ball, the housing, or yourself. You can also press against the ball with your C clamp or vise, but remember to support the shell of the bearing when you do this. Once the ball moves freely you can continue on.
If you have not pressed the race in tight enough the ball will rattle around. Use the lock plate to press the race in until the ball can just be moved by hand without having to use a prying device. This is where it is handy to have the tool, but you can turn the lock plate with a brass punch or pin spanner as well, but it is more difficult. If you make it too tight and can’t move the ball anymore, just back it off a notch. You may need to reset the race as described above.
As the bearings heat up, the ball expands, so if you do not leave enough play in the joint they will bind when hot. Not so much play that you can move the ball side to side significantly, but it should not be difficult to turn the ball by hand.
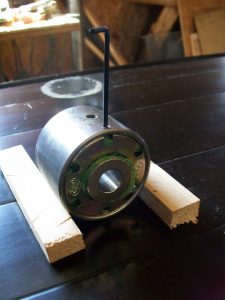
Once the end play has been set, install the set screw to keep the lock plate from moving. I used anti-seize on the screw just in case even though it is stainless. As the races wear (I have no wear yet after 10k mi) you can remove the set screw and tighten down the lock plate to remove the excess play. If you are clever, you can do this without even removing the arm from the car (or even dropping the arm down.)
If you have any questions along the way, please don’t hesitate to contact me.
Moosehead Engineering Spherical Joint assembly instructions.
Preparation
Unpack your purchase and make sure it is all there. For each set you should have two shells, two nickel plated balls, four plastic races, two circlips, two thick washers, two threaded plates, two set screws, and two Zerk fittings.
Basically, the bushing is made up of the shell, the ball, the races, and the retaining parts. The circlip and the washer retain one end, one race is pressed in, the ball is inserted then the other race is pressed in.
You should use a high quality bearing grease to lube these bushings. High temperature grease is best since the passenger side joint is exposed to exhaust heat.
Building the joint
Note: You can either press the bare shell into the arm and build the joint in the arm or build the joint and press it into the arm afterwards. You may find it easier to work with just the joint and press it into the arm at the end, or you may prefer to have the arm clamped in a vise while you put things together. I have done it both ways, so it is up to you. You cannot use the zerk fitting to grease the bushing if you press the shell in first. If you plan to press the shell in first, check the installation section before you press the shell in.
So, begin by installing the circlip. No tools are needed here, just get the circlip split and started in the groove. Once you do that you can work it into the groove bit by bit.
Now place the large washer inside the shell. Do not forget this step or you’ll get to the end and facepalm.
Now the hard part. You must press the first race in. You can do this with a hydraulic press, a large vise, a large C clamp, or a large bolt along with some washers and/or large sockets. The flat side of the race faces the washer you just installed. The race is meant to be a tight press fit. You cannot press it in by hand and you cannot tap it in with a hammer. Trust me. Press it in tight against the washer, but make sure that you don’t go so far that you force the snap ring out, just snug against the washer. If you have done it right, the washer will not move by hand and the snap ring won’t look like it is ready to explode.
Now install the ball. If you have not got a grease gun, now is the time to apply some grease to the joint. The gap left between the races once they are pressed in is about 1/8 of an inch, so you don’t need tons of grease.
Install the second race. The cupped side obviously goes toward the ball. I know you know that, but some people need constant supervision, so I figured I mention it. You will need to press this race in as well. Here is where it is handy to have a large socket. You have to support the shell while you press the race in and you need to clear the neck of the ball. You want to press the race in so that when you are finished, there should be a little bit of play, so the ball can not only pivot, but it can move side to side. If you go too far and the ball is too tight, don’t worry, we’ll cover adjusting the end play later.
Screw in the lock plate with the stamped logo facing outward, but don’t worry about tightening it yet. The lock plate screws in and retains the race you just pressed in. The set screw keeps the lock plate from turning on its own.
Greasing the joint
While the joint is out, you can use a grease gun to grease the joint. Simply screw in the Zerk fitting and add grease until it won’t take any more or until it starts to squeeze past the races. Now remove the fitting and place it in a drawer somewhere and forget about it. You won’t need it again for a long time.
Installing the joint into the arm
This requires a hydraulic press or a really good threaded rod type press to execute but it is simple. Press the old bushing out, press the new one in. I like to press the joint in so that the lock plate faces the center of the car, but it is not necessary to do it this way. What is necessary is that you press the joint in so that it is centered and that you leave enough room to remove the set screw. If you have not left enough room, the housing is not centered in the arm. I also like to leave the set screw with the hole pointing down. Again, not strictly necessary.
Important note: If the housing presses into the arm too easily, like there is too much clearance, stop and contact me. If this happens, please measure the housing to make sure it is the correct diameter. I have had one single arm that had a hole that was too big. I used a couple of drops of bearing retainer Lok-tite to secure it and the problem was solved.
Setting the end play in the bearing
You cannot pre-set the correct amount of play in the joint while the joint is out of the arm because once it is pressed into the arm the clearances change. You need to adjust it before you install the arm into the car. If you have purchased a pre-assembled set you need to check this before installing the arm in the car. Ideally you want to be able to pivot the ball by hand without any tools, but you don’t want it to rattle around.
Now, you If you pressed the second race in too tightly or screw the lock plate down too tightly, the ball won’t be free to pivot and will bind. To free up that other race a little, you need to unscrew the lock plate a couple of notches and hit the ball on the opposite side to drive that race apart a little. Use a soft faced or brass mallet, a block of wood and a hammer, or slam the flange on the ball down on a piece of wood while holding the housing, whatever works for you so long as you don’t damage the ball, the housing, or yourself. Once the ball moves freely you can continue on.
If you have not pressed the race in tight enough the ball will rattle around. Use the lock plate to press the race in until the ball can just be moved by hand without having to use a prying device. This is where it is handy to have the tool, but you can turn the lock plate with a brass punch or pin spanner as well, but it is more difficult. If you make it too tight and can’t move the ball anymore, just back it off a notch. You may need to reset the race as described above. Once the end play has been set, install the set screw to keep the lock plate from moving. I used anti-seize on the screw just in case even though it is stainless. As the races wear (I have no wear yet after 10k mi) you can remove the set screw and tighten down the lock plate to remove the excess play. If you are clever, you can do this without even removing the arm from the car (or even dropping the arm down.)
If you have any questions along the way, please don’t hesitate to contact me: paul@mooseheadengineering.com

